Wednesday, July 30, 2014

I'D RATHER BE GARDENING: About that 'Sweet Summer Love' .....


Clematis, that is. Back in May I did a short post about it here. I promised I would post an update on its performance, so here 'tis. 


'Sweet Summer Love' Clematis, new this year from Proven Winners

I paid a whopping $26 for it and I must say I'm a little disappointed. But then again, with a little more time I expect to see a much better show in the years to come. 


Close up of first year 'Sweet Summer Love' Clematis

My front yard is deep and this arbor is situated quite far from my front entry. I'd prefer something with more impact, and viewable from the street and my walkway so that I can enjoy it more while coming and going. I'm thinking maybe a climbing rose, but I don't want something that will swallow up my lovely arbor. Do you have a favorite climbing rose or other vine that you might suggest?


My cutting garden (click to enlarge)

Here is what that garden looks like now, in late July. Its a new garden and you can read more about it here. 


Zinnias and Bee Balm (click to enlarge)

The perennials I transplanted there are going great guns right now, as are the zinnias. Thanks to Mother Nature and her fabulous rains and unusually low temperatures this summer, gardening has been even more of a pleasure this year!


My cutting garden in Mid May 2014 (click to enlarge)

What a difference a few months can bring! This was my cutting garden in late May. You can see the new clematis quickly growing up the right side of the arbor. I need something that blooms with those tall Gladiator Allium - to hide their ugly foliage! I intend to divide and transplant some tall bearded iris there very soon. Now is the time of year to do that, you know. Hoping that will do the trick.

I think a vine on the arbor that blooms in early summer would be nice. You know, in early June after the spring flush of bloom is past.


Clematis 'Jackmani' (click to enlarge)

I really think I'll move the 'Sweet Summer Love' clematis to my back deck. Maybe it could make friends with this Jackmani. 


Purple Passion! (click to enlarge)

I kinda like purple, can you tell?


New beads! (click to enlarge)

Actually, I like all colors, especially if they are bright and cheerful like these new beads I'm now making for my Etsy shop!


New buttons and pendants, too! (click to enlarge)

I've recently began creating lots of new buttons, beads and pendants for you to include in your own creative projects!


Birdies, bees and butterflies galore! (click to enlarge)

I am having so much fun making these! 

I listen to audio books by British authors on Librivox.org while creating my pottery, which really seems to take me to the English cottage gardens of my dreams. Especially if the reader is British, too! Right now I'm listing to "Cranford" by Elizabeth Gaskell, one of my very favorite 19th century British authors.

Speaking of which, its time to get back into my studio. You know I really LOVE making my pottery, but sometimes, just sometimes, well, you know....


I'D RATHER BE GARDENING!

NOTE: You may have noticed I have made my blog wider and my photos are larger. Please let me know if you are having problems viewing my blog properly. I tried to choose a size to target most technology, but I'm not very technical so it will be interesting to see if my new size was a good idea or not!

Monday, July 21, 2014

Those Sweet Little Patty Pans PLUS A Patty Cake Recipe Card!

"It is all ready to put into the oven. Such lovely pie-crust; 
and I put in a little tin patty-pan to hold up the crust; 
and I made a hole in the middle with a fork to let 
out the steam - Oh I do wish I could eat my own pie,
 instead of a pie made of mouse!"
 The Tale of the Pie and The Patty Pan by Beatrix Potter


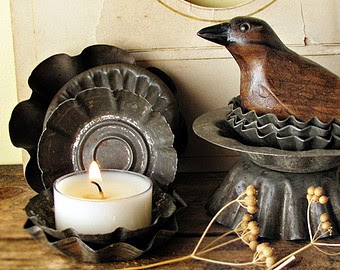
In Miss Potter's amusing tale a little dog called "Duchess" inserts a small patty pan inside a large meat pie to "hold up the crust".  But what exactly are patty pans? 

sparrowsalvage on Etsy
Image courtesy of SparrowSalvage's Etsy Shop

Well, it appears that patty pans, also called petty pans and queen cake tins, are darling little molds used to make such delicacies as madelines, teacakes, petit fours and meat pies. They can also be made from glass or china, but more often they are made from tin. 

Image courtesy of Johnnys Selected Seeds

Thus we can now see how the sweet little patty pan squash came by its name! And today I have a delightfully yummy recipe for a Patty Cake that I'm happy to share. My favorite way to use patty pan squash!

Patty Cake - so yummy! Click to enlarge.
I found my little scallop-edged patty pan mold on the cheap at a Big Lots or someplace like that, can't quite remember, but I know it wasn't from an expensive specialty shop.


Image size is 4 x 10 inches. Click to enlarge/download.

Very few ingredients and very easy to make! Just click the recipe image and download to your computer. I recommend printing on cardstock using landscape setting.

New porcelain creations! (click to enlarge)

I even painted a ceramic platter with chipmunk and bunny playing Pat-A-Cake. Looks like some birds are about to swoop down for some of that Patty Cake!

New veggies! (click to enlarge)

And remember my EARLIER POST which included a sneak peak of my bisqued veggies? Well I finally glazed them and they came out of the kiln this morning looking just yummy!!! The pieces with the swirl designs are actually a sliced Tri-Color Beet and I blogged about them HERE. I grew them one year and that post also has a link to a great recipe for BEETS WITH ORANGE JUICE.

Listing all of the above ceramics and more tomorrow in my Etsy shop!

I hope you enjoy my recipe - won't you please share your favorite patty pan squash recipes?

Tuesday, July 8, 2014

I'd Rather Be Gardening: A Mid-Summer Cutting Garden

"Most of us [....] pass through a flowery doldrums 
toward the end of July. The great Spring 
procession has gone. A gap comes in the 
parade before the big division of Summer appears."
The Gardener's Bed-Book by Richardson Wright

Zinnia 'Northern Lights Blend' and Purple Coneflower (click to enlarge)


There may still be a little truth in the quote above from Mr. Wright's 1929 publication, but today we are fortunate to have an endless variety of flowers to beautify our gardens throughout the summer. Today I'm going to share with you some of my favorites - both annuals and perennials - all of which are great for cutting to bring indoors where they can be enjoyed in the comfort of your home.

Cutting garden early July 2014 (click to enlarge)

The photo above shows my cutting garden as it is today, and this is its very first summer. We prepared the bed last fall by tilling and adding a composted soil mix from a local supplier. Our primary purpose for creating this garden initially was to address an issue with stormwater runoff from a nearby downspout. 

Dry creek bed ready for small bridge. (click to enlarge)

So this was a perfect spot for a rain garden (a huge subject for a future blog post) prompting us to create a dry creek bed. Future plans include constructing a small footbridge here.

Clockwise from top left: Russian Sage 'Little Spire', Yarrow 'Pink Grapefruit', Coneflower 'Bravado' and 'White Swan', Bee Balm 'Petite Delight' (click to enlarge)

Then around about April or May this year I transplanted numerous amounts of existing perennials from areas in the backyard where the previous owners had planted them. 

Transplanted Liatris 'Kobold' (click to enlarge)

Just a few weeks ago I found some Liatris 'Kobold' popping up among a huge bed of yarrow and have transplanted it to my new cutting garden. Its so much fun gardening at a new home and finding these "little surprises". The previous owner left me a folder with all of the plant tags so that's how I know what all these perennials are.

 Clockwise from upper left: Spirea 'Little Princess', Veronica 'Tickled Pink', Shasta Daisy 'Silver Princess', Stachys 'Hummelo' (click to enlarge)

Above are a few other lovely "surprises" that I have growing elsewhere on my property, which are also great cutting flowers. Who knew Spirea would make such a great cut flower! They are actually drying in my vases and still look nearly as lovely as when they were freshly cut.


Ornamental oregano (click to enlarge)
Verbena bonariensis (Mexican Verbena) (click to enlarge)

It's been wonderful to have so many existing perennials to divide and transplant from other areas in my yard, but I did purchase a few new things. In addition to the Ornamental Oregano and Mexican Verbena shown above, I found a great buy on my favorite lavender - 'Fat Spike'. 


Ready for stone walkway and lavender borders. (click to enlarge)

Future plans for my cutting garden include installing a natural stone pathway and my 'Fat Spike' lavender will make a lovely border. I've grown it before and I can attest to its hardy nature. I couldn't believe I found it at a nursery here, seems most of them only carry 'Hidcote' or 'Munstead', both of which I have growing elsewhere already and have nearly lived out their days. 'Fat Spike' is far superior, in my opinion.


Seeded zinnias around transplanted perennials.  (click to enlarge)

Clockwise from top left: Lilliput, Northern Lights Blend, Envy, Fantasy

Then in early June I filled in the gaps around the perennials by seeding zinnias. I also seeded cosmos and Mexican verbena in late June but had no luck with germination on those, most likely because I failed to keep them moist.


So....here we are...what the fuss is all about. I found that the Daisies and the Coneflower were the first to droop, but then I did nothing except change the water a few times. I know there are things you can to do to prolong the bloom, but I've never done any of them.


cynthiacranespottery.etsy.com -  More new creations coming in mid-late July!

And it surely comes as no surprise that the lovely colors, and the birds, the bees and the butterflies in my new cutting garden, all come together to inspire my porcelain ceramic art!


I would love to know your favorite cutting garden flowers, be they annual or perennial.

So please do comment and let me know your thoughts as well as how you keep your blooms lasting in the vase. Feel free to include your own blog address in your comment, too!


Happy gardening everyone! I'm off to check on my cutting garden now because, well, you know -

I'd Rather Be Gardening!


Note on commenting: Many of you will be pleased to see that I have removed the Disqus comment gadget from my Blog. Hopefully you will find commenting here a much better experience now!

Wednesday, July 2, 2014

My Boring Ranch Home Exterior Gets a New Look - Cottage Style (Phase 1)


 "You enter the cottage through a small lattice gate,
step over about a yard of cobbles and knock 
at the front door, which is painted green 
and hung with a very pretty brass door-knocker 
that I bought in Venice, in a thunderstorm. 
You open the front door, and find yourself 
in a square hall, roofed with very thick beams." 
A Thatched Roof by Beverly Nichols


My previous home, a 1937 cottage style cape in Virginia.
(click to enlarge)

It has been several weeks since my last post and I'm about to tell you what has kept me so very very busy, and away from my Blog. 

If you've been following along you know that in 2012 my husband had to take a job transfer so we moved away from our lovely little 1937 cottage style cape in a historic neighborhood. We had only been in that home a few years, and it was our favorite of all the other homes we'd owned in the 32 years we'd lived in Virginia.

My new home, a 1999 transitional rancher in West Virginia.
(click to enlarge)

As if the move wasn't hard enough both physically and emotionally, pictured above was the best home we could find in our new area within our price range in a good location - and this after looking at over 70 homes in 3 states over an 8 month period. In short, we settled. 

I won't go into all the details of why we chose this home, but one of the deciding factors was that it was well under budget which allowed us to transform it. We began with the interior, which is still under renovation but nearly complete. You WILL NOT want to miss that post! So be sure to join and follow my blog so you'll be able to keep up.

But this post is about the front porch and landscaping makeover we've undertaken these past several weeks.

Natural stone raised bed, dry laid with soil "mortar". (click to enlarge)

We first set out to create a raised a bed on the left end of the front foundation by salvaging an old stone wall from the back of our property. Our front yard slopes a bit here and the raised bed makes for a nice transition to a new cutting garden/rain garden we've created at the end of the house. We had a few huge boulders and most all of the stones were rounded which makes it a challenge to create a retaining wall. 

I found a great site on the web that showed how to create it using soil as mortar. We started by making a trench and filling it with gravel, then began stacking the stones and filling around them with the soil mortar. We backfilled with more gravel and a compost soil mix we brought in from a local supplier. We also made sure to create a 16" wide gravel area next to the foundation, which is always a good thing to do and will make it easier for me to manage the flower boxes I plan to install there.

Front porch, sidewalk and landscaping makeover - BEFORE (click to enlarge)

Now, since we'd blown our budget on the interior reno we're doing our home exterior makeover in phases, with the front porch and sidewalk reno being Phase 1. The porch is extremely shallow (I call it a "front porch wanna-be") so we chose to remove the railings. And to give more "presence" to the original "dinky" porch posts we wrapped them with PVC boards, which we then finished off with a decorative post base and cap. 

Front porch, sidewalk and landscaping makeover - AFTER.
(click to enlarge)

These are not kit components, which can be pricey, so we cut and constructed the wraps from stock PVC "lumber". Mind you my husband and I are NOT carpenters, but this actually went very well and we are VERY pleased! 

Working with PVC lumber is much like working with real wood, amazingly enough, but there are definitely some important differences. It requires a particular type of saw blade for one thing, and the "dust" that accumulates is not at all "environmentally friendly". It is plastic after all.
 
Close up of stained concrete porch and sidewalk. (click to enlarge)
 

We also stained our concrete front porch floor and sidewalk a combo of brown and grey to blend in with the natural stone we used in the landscaping, then added a grey manufactured stone border around the sidewalk to tie in with the house color. 

Nearly a blank slate for a new cottage garden.
(click to enlarge)

A natural stone footpath surrounded by creeping Mother of Thyme was then installed from the sidewalk leading to our new rain garden/cutting garden. 

Next Phase: window boxes! or new door? cupola maybe? Decisions, decisions!
(click to enlarge)

Well, I'm still a long long way from achieving the charm of the 1937 cape I had in Virginia, but I know I'll get there. Having to run nearly every project through the Architectural Review Board in my new neighborhood is agonizing, however. But it will do for now, until my husband retires in a few years when we may yet again relocate.

Future Phases of our ranch home exterior makeover will include a storm door, window boxes, a cupola (to break up the long roofline) and a pergola over the garage doors. And that's just the front of the house! I must say I'm very tired and glad to be back in my studio!

Please feel free to email me directly with any questions! 

Porcelain ceramic greenware tiny houses and mini veggies ready to be bisque fired.
(click to enlarge)

Here's a sneak peak at some lovely things I've sculpted this week which are nearly ready for a bisque fire. Other than a few herbs and tomato plants, I don't yet have a kitchen garden so I'm having fun creating some imaginary baby veggies, as well as a great deal of other new lovelies for my Etsy shop, to be listed probably around mid to late July.

Next post: Some of my favorite flowers from my cutting garden!
(click to enlarge)

Next post:  In my "I'd Rather Be Gardening" Series, I'll be sharing some of my favorite flowers from my new cutting garden and a very special nursery where I purchase many of them. And remember my last post about the new clematis "Sweet Summer Love"? Well I'll have photos and an update on how it is performing for me.